In This Article
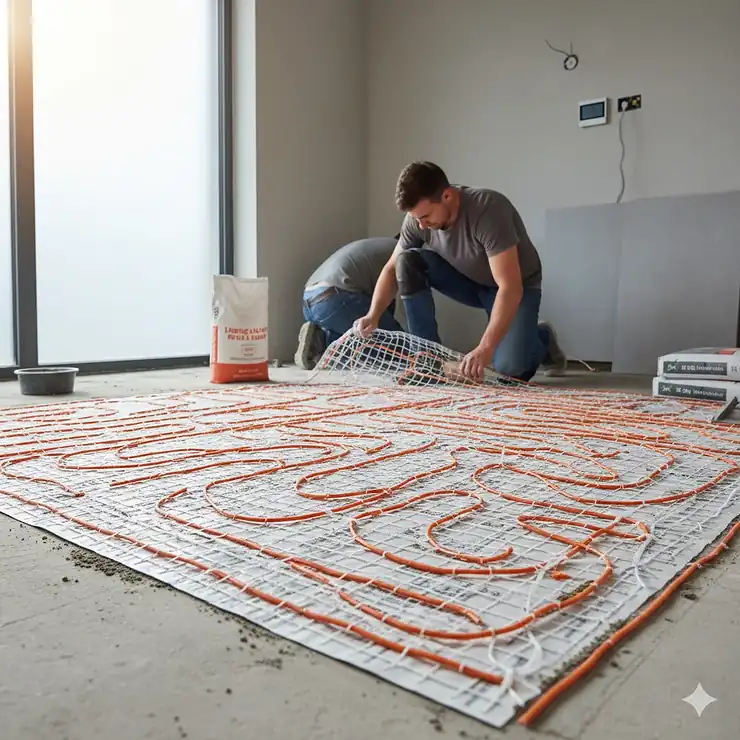
Picture this: you step out of bed on a frigid winter morning, and instead of that teeth-chattering shock of cold tile, your feet land on a surface that’s warm, inviting, and absolutely luxurious. That’s the magic of a floor heating mat.
If you’re tired of icy bathroom floors, drafty kitchens, or that one room that never seems to warm up, a floor heating mat might be your game-changer. These under-floor systems use radiant heat technology to transform any space from uncomfortably cold to perfectly cozy. According to the U.S. Department of Energy, radiant heating is more efficient than baseboard heating and typically outperforms forced-air systems because it eliminates duct losses.
But here’s the thing: not all floor heating mats are created equal. With dozens of brands, sizes, and features flooding the market in 2025, how do you choose the right one? I’ve spent weeks researching, comparing specifications, and analyzing customer feedback to bring you this comprehensive guide. Whether you’re renovating a bathroom, warming up a basement, or planning a whole-home installation, you’ll find exactly what you need here.
Quick Comparison Table
| Product | Coverage Area | Power | Price Range | Best For | Rating |
|---|---|---|---|---|---|
| LuxHeat 20sqft Kit | 20 sq ft | 240W, 120V | $200-$300 | Small bathrooms | ⭐⭐⭐⭐⭐ |
| VEVOR 100sqft System | 100 sq ft | 1200W, 120V | $300-$450 | Large rooms | ⭐⭐⭐⭐½ |
| SunTouch TapeMat 30sqft | 30 sq ft | 360W, 120V | $350-$500 | Mid-size spaces | ⭐⭐⭐⭐⭐ |
| QuietWarmth 30sqft Float | 30 sq ft | 360W, 120V | $250-$380 | Floating floors | ⭐⭐⭐⭐½ |
| Warming Systems 25sqft | 25 sq ft | 300W, 120V | $220-$340 | Budget-friendly | ⭐⭐⭐⭐ |
| LuxHeat 60sqft Premium | 60 sq ft | 720W, 120V | $450-$650 | Whole rooms | ⭐⭐⭐⭐⭐ |
| VEVOR 20sqft Compact | 20 sq ft | 240W, 120V | $150-$250 | Entry-level | ⭐⭐⭐⭐ |
💬 Just one click – help others make better buying decisions too!😊
Top 7 Floor Heating Mat Systems: Expert Analysis
1. LuxHeat 20sqft Floor Heating Mat Kit – Best Overall for Small Spaces
The LuxHeat 20sqft Floor Heating Mat Kit is hands-down one of the most complete and reliable systems I’ve encountered. This kit comes with everything you need: a 120-volt self-adhesive heating mat (20″ wide x 12.2′ long), the highly-rated OJ Microline UDG4-4999 programmable thermostat with built-in GFCI protection, a floor sensor, and an installation monitor with alarm.
Key Specifications:
- Coverage: 20 square feet
- Power: 240W at 12W per sq ft
- Voltage: 120V, 2.0 Amps
- Mat thickness: 1/8 inch
What makes this system shine is its dual-wire technology with aluminum shielding, which reduces electromagnetic fields (EMF) to ultra-low levels. The mat uses 3-inch pre-spacing that allows you to flip, turn, and manipulate it around corners and obstacles. The white fiberglass mesh can be cut, but remember—never cut the red heating element.
Customer Feedback: Users consistently praise the quality and ease of installation. One reviewer mentioned, “The thermostat is intuitive, and the mat stayed flat during installation thanks to the double-sided adhesive.” Several customers noted that their bathroom floors heat up within 30-45 minutes.
✅ Pros:
- Complete kit with premium thermostat
- UL certified for wet locations
- 25-year limited warranty
- Low EMF technology
❌ Cons:
- Higher price point than budget options
- Requires embedding in mortar or self-leveling compound
Price Range: $250-$350
2. VEVOR 100sqft Floor Heating Mat System – Best for Large Coverage
For those tackling bigger projects, the VEVOR 100sqft Floor Heating Mat System delivers impressive coverage at a competitive price. This system includes a 100-square-foot heating mat (1.7′ x 61′), a digital programmable thermostat with GFCI protection, an installation monitor, and a comprehensive instruction manual.
Key Specifications:
- Coverage: 100 square feet
- Power: 1200W at 12W per sq ft
- Voltage: 120V, 10.0 Amps
- Temperature range: 14°F to 113°F
The VEVOR system features 2-inch cable spacing and a 1/8-inch thick mat with double-sided adhesive that grips the subfloor securely. The touchscreen thermostat offers dual sensing (air and floor), 7-day scheduling with 4 events per day, power logging, and child lock features.
Customer Feedback: One homeowner who installed this in their kitchen and dining room reported, “It works perfectly and takes no time to heat up. Installation was as easy as other premium systems but at half the cost.” Multiple reviewers appreciated the value proposition, noting that VEVOR provides excellent performance without the premium price tag of competing brands.
✅ Pros:
- Exceptional value for large areas
- Smart thermostat with multiple features
- Easy to cut and manipulate around obstacles
- Includes all necessary components
❌ Cons:
- Instructions could be more detailed
- Takes 4+ hours to reach full heat under tile
Price Range: $350-$500
3. SunTouch TapeMat 30sqft Kit – Premium Choice with Proven Track Record
SunTouch by Watts Radiant brings over 30 years of floor heating expertise to the table with their TapeMat 30sqft Kit. This system has earned a stellar reputation among DIY installers and professional contractors alike. The kit includes the signature orange open-weave mesh mat (2′ x 15′), the SunStat Command programmable touchscreen thermostat, a LoudMouth installation monitor, and detailed installation manual.
Key Specifications:
- Coverage: 30 square feet
- Power: 360W at 12W per sq ft
- Voltage: 120V, 3.0 Amps
- Mat thickness: 1/8 inch with open-weave design
What sets SunTouch apart is the orange mesh that’s instantly recognizable and the blue heating wire that can be pulled out and run around obstructions. The mat can be installed in one day—no waiting for mortar to cure overnight before laying tile. The system’s SmartStart Technology automatically adjusts start times to ensure your floor reaches the set temperature exactly when scheduled.
Customer Feedback: One satisfied customer shared, “Wife LOVES it. Best purchase I’ve made for my remodeled bathroom. I’ve also increased my resell on the house.” The consensus is clear: SunTouch delivers professional-grade results with homeowner-friendly installation.
✅ Pros:
- Industry-leading 30+ years experience
- One-day installation possible
- SmartStart Technology for energy efficiency
- Compatible with multiple flooring types
❌ Cons:
- Premium pricing
- Some customers report warranty claim difficulties
Price Range: $400-$550
4. QuietWarmth 30sqft Float Mat – Revolutionary Ultra-Thin Design
The QuietWarmth 30sqft Float Mat is a complete game-changer for anyone installing floating floors. Unlike traditional floor heating mats that require mortar or self-leveling compound, QuietWarmth uses a razor-thin conductive ink film technology that’s only 0.016 inches thick. This mat (3′ x 10′) installs directly on your subfloor or underlayment with zero mess.
Key Specifications:
- Coverage: 30 square feet
- Power: 360W at 12W per sq ft
- Voltage: 120V
- Film thickness: 0.016 inches (virtually invisible)
QuietWarmth is specifically approved for floating flooring options 4mm or thicker, including laminate, engineered hardwood, luxury vinyl tile/plank, and enhanced vinyl products. The system consumes up to 50% less power than traditional wired systems, and the film is self-limiting so it never exceeds 85°F—protecting your flooring from heat damage.
Customer Feedback: Users rave about the installation simplicity. One reviewer noted, “Installation took half the time compared to other floor heat systems. No mortar, no mess, just roll it out and go.” Many highlight the energy efficiency, with one stating, “I heat my bedroom floor for less than $1 per day.”
✅ Pros:
- Ultra-thin design adds no height
- No mortar or messy installation
- 50% less power consumption
- Self-limiting temperature protection
❌ Cons:
- Not suitable for tile installations
- Cannot cut width (only length)
- Thermostat sold separately
Price Range: $280-$420
5. Warming Systems 25sqft Heating Mat – Best Budget-Friendly Complete Kit
The Warming Systems 25sqft Heating Mat offers excellent value for budget-conscious homeowners who don’t want to compromise on quality. This complete kit includes a 25-square-foot heating mat (20″ wide x 15′ long), a TH115-AF-120S programmable thermostat with floor sensor, two additional floor sensors, an installation warning monitor, and comprehensive documentation.
Key Specifications:
- Coverage: 25 square feet
- Power: 300W at 12W per sq ft
- Voltage: 120V, 2.5 Amps
- Mat construction: 3-inch pre-spaced cable on fiberglass mesh
The heating elements are pre-spaced at 3 inches within the mat, making layout simple for rectangular or square areas. The included thermostat is easy to operate, rated for 16 amps, and includes integrated GFCI protection. The mat features double-sided tape on both sides for maximum adhesion to any subfloor.
Customer Feedback: One homeowner shared, “For the price, you can’t beat it. Installed it in my bathroom, and it heats up nicely. The extra floor sensors are a nice bonus.” Reviews consistently mention the solid construction and reliable performance at a lower price point than premium brands.
✅ Pros:
- Budget-friendly pricing
- Includes two floor sensors
- UL listed for USA and Canada
- Safe for wet areas
❌ Cons:
- Basic thermostat compared to premium models
- Limited smart features
Price Range: $220-$350
6. LuxHeat 60sqft Premium System – Best for Whole Room Coverage
When you need to heat an entire room, the LuxHeat 60sqft Premium System is the professional-grade solution. This larger kit provides 60 square feet of coverage (20″ wide x 36.6′ long) and includes the same high-quality components as LuxHeat’s smaller systems: the OJ Microline UDG4-4999 programmable thermostat, installation monitor with alarm, and floor sensor.
Key Specifications:
- Coverage: 60 square feet
- Power: 720W at 12W per sq ft
- Voltage: 120V, 6.0 Amps
- Technology: Dual-wire with aluminum EMF shielding
This system maintains all the premium features of LuxHeat’s smaller mats, including the ability to flip, turn, and manipulate the mat to fit your space. The dual-wire technology reduces electromagnetic fields to ultra-low levels, and the system is UL certified for both dry and wet locations.
Customer Feedback: Contractors and DIY installers appreciate the coverage area. One professional installer noted, “Perfect for master bathrooms or medium-sized kitchens. The quality is consistent across the entire mat length.” Homeowners love the even heat distribution across larger spaces.
✅ Pros:
- Covers entire medium-sized rooms
- Premium OJ Microline thermostat included
- Backed by 25-year warranty
- Professional-grade quality
❌ Cons:
- Significant upfront investment
- May require 240V circuit for optimal performance
Price Range: $500-$700
7. VEVOR 20sqft Compact System – Best Entry-Level Option
For first-time buyers or small projects, the VEVOR 20sqft Compact System offers an affordable entry point into floor heating. This kit includes a 20-square-foot mat (1.6′ x 13.1′), a digital floor sensing thermostat with GFCI protection, an installation monitor, and adhesive backing for easy installation.
Key Specifications:
- Coverage: 20 square feet
- Power: 240W at 12W per sq ft
- Voltage: 120V, 2.0 Amps
- Operating range: 14°F to 113°F
Despite the lower price, VEVOR doesn’t skimp on features. The system includes dual sensing (air and floor), a 7-day programmable schedule, power logging, and child lock. The 2-inch cable spacing allows for flexible layout options around corners and obstacles.
Customer Feedback: Budget-conscious homeowners appreciate the value. One reviewer stated, “Great price for a complete system that actually works. My bathroom floor is warm every morning, and installation was straightforward.” Several noted it’s a perfect starter system for testing floor heating before committing to larger areas.
✅ Pros:
- Lowest price point for complete kit
- All essential features included
- Easy installation for beginners
- Compact size ideal for small bathrooms
❌ Cons:
- Basic thermostat interface
- Shorter warranty period than premium brands
Price Range: $180-$280
✨ Don’t Miss These Exclusive Deals!
🔍 Take your home comfort to the next level with these carefully selected floor heating mat systems. Click on any highlighted item above to check current pricing and availability. These heating solutions will help you create authentic warmth your family will love all winter long!
What is a Floor Heating Mat?
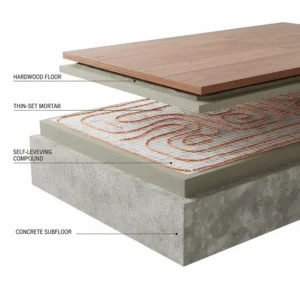
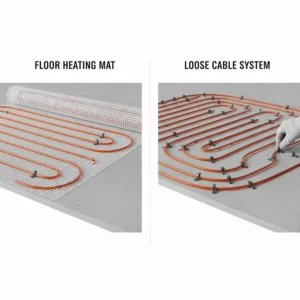
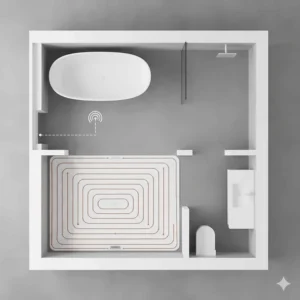
A floor heating mat is an electric radiant heating system consisting of heating cables pre-attached to a flexible mesh backing. These mats install beneath your floor surface—whether tile, stone, laminate, or vinyl—and generate gentle, consistent warmth that radiates upward through the flooring material. Unlike forced-air systems that heat the air, floor heating mats use radiant energy to warm objects and people directly, creating a more comfortable and energy-efficient heating experience.
How to Choose the Perfect Floor Heating Mat
1. Measure Your Space Accurately
Calculate the heated area by measuring the room and subtracting spaces occupied by fixed fixtures like cabinets, toilets, and bathtubs. Round up to the nearest standard mat size. For example, if you calculate 18 square feet, order a 20 square foot mat.
2. Determine Your Voltage Requirements
Most residential systems operate on 120V circuits, suitable for areas up to 150 square feet. Larger spaces may require 240V systems. Consult an electrician to verify your electrical capacity before purchasing.
3. Consider Your Flooring Type
Tile and stone conduct heat excellently. Laminate and engineered wood work well but may require special considerations. For floating floors, choose systems like QuietWarmth specifically designed for that application. Avoid thick carpeting, as it insulates the floor and reduces efficiency.
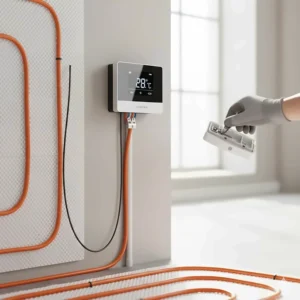
4. Evaluate Thermostat Features
Basic thermostats offer simple on/off control. Programmable models allow scheduling for different times and days. Smart thermostats provide WiFi connectivity, remote control via smartphone, and energy usage monitoring. Choose based on your comfort preferences and energy efficiency goals.
5. Factor in Installation Requirements
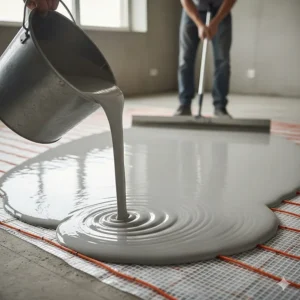
Some systems require embedding in mortar or self-leveling compound, ideal for tile installations. Others, like QuietWarmth, install without mortar—perfect for floating floors. Consider your DIY skills or factor in professional installation costs.
6. Compare Warranty Coverage
Quality manufacturers offer warranties ranging from 10 to 25 years. LuxHeat provides a 25-year limited warranty, while budget brands may offer shorter coverage. Longer warranties typically indicate higher quality components.
7. Calculate Operating Costs
Floor heating mats typically consume 12 watts per square foot. A 30-square-foot system (360W) running 8 hours daily costs approximately $10-$15 monthly at average electricity rates. Smart thermostats and proper insulation can reduce costs by 15-20%.
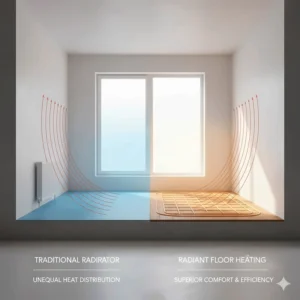
Floor Heating Mat vs Traditional Heating Systems
| Feature | Floor Heating Mat | Forced-Air Heating | Baseboard Heating |
|---|---|---|---|
| Energy Efficiency | High (no duct losses) | Moderate (10-30% duct losses) | Moderate |
| Comfort Level | Excellent (even heat distribution) | Fair (hot/cold spots) | Fair (localized heat) |
| Allergen Distribution | Minimal (no air movement) | High (circulates dust) | Low |
| Noise Level | Silent operation | Noisy blowers | Silent |
| Installation Cost | $8-$20 per sq ft | $4,000-$10,000 whole home | $700-$1,500 per room |
| Operating Cost | 25-30% lower than forced air | Baseline | Similar to forced air |
Installation Tips for Maximum Performance
Prep Your Subfloor Properly: Ensure the subfloor is clean, level, and dry. Any imperfections will telegraph through the mat and finished flooring.
Use the Installation Monitor: Always connect the installation monitor before and during installation. It will sound an alarm if you accidentally damage the heating cable, saving costly repairs later.
Test Resistance Throughout: Check the cable resistance with a multimeter at multiple stages: before installation, during installation, and after embedding in mortar. Document these readings for warranty purposes.
Maintain Proper Spacing: Follow manufacturer specifications for cable spacing. Too close can create hot spots; too far reduces heating efficiency.
Insulate Below: Install insulation board beneath the heating mat when possible. This directs heat upward into your room rather than downward into the substrate, improving efficiency by up to 50%.
Plan Your Thermostat Location: Position the thermostat sensor probe between two cable runs—never directly over a cable. The sensor should be embedded at the same depth as the heating cables for accurate temperature readings.
Energy Efficiency and Cost Savings
According to research published in Scientific American, radiant floor heating transmits heat approximately 15% more efficiently than conventional radiators. The efficiency gains multiply significantly with proper insulation and system design.
The U.S. Department of Energy notes that radiant heating eliminates duct losses that typically reduce forced-air system efficiency by 20-30%. Because floor heating mats warm objects rather than air, you can maintain comfortable temperatures at settings 2-5°F lower than with conventional heating.
Real-World Savings:
- Small bathroom (50 sq ft): $12-$18 monthly operating cost
- Medium bathroom (100 sq ft): $24-$35 monthly operating cost
- Master bathroom (150 sq ft): $35-$50 monthly operating cost
Smart thermostat programming reduces costs further by heating only when needed. Many users report 20-30% energy savings compared to previous heating methods.
Top Benefits of Floor Heating Mats
Ultimate Comfort
There’s nothing quite like stepping onto a warm floor on a cold morning. Floor heating mats create an even blanket of warmth across your entire floor surface, eliminating cold spots and drafts. The gentle radiant heat feels natural and comfortable, similar to the warmth of sunshine.
Energy Efficiency
Because radiant systems heat objects and people directly rather than warming air that rises to the ceiling, they operate more efficiently than forced-air systems. The Department of Energy confirms radiant heating typically outperforms baseboard and forced-air systems by eliminating duct losses.
Improved Air Quality
Without blowers circulating air, floor heating mats don’t distribute dust, pet dander, or allergens throughout your home. This makes them ideal for people with allergies or respiratory sensitivities.
Silent Operation
Forget the whoosh of forced-air vents or the clanging of radiators. Floor heating mats operate in complete silence, creating a more peaceful home environment.
Increased Home Value
Homes with radiant floor heating, especially in luxury bathrooms and kitchens, command premium prices and sell 6-8% faster according to real estate data. Buyers recognize quality and comfort when they experience warm floors firsthand.
Design Flexibility
Floor heating mats are completely invisible once installed. No radiators, baseboard units, or vents to work around when decorating. You gain complete design freedom for your space.
Common Installation Mistakes to Avoid
Cutting the Heating Cable: The fiberglass mesh can be cut, but never cut or shorten the heating cable itself. This instantly voids the warranty and ruins the entire mat.
Insufficient Power: Ensure your electrical circuit can handle the mat’s power requirements. Overloading circuits creates fire hazards and trips breakers.
Skipping the Installation Monitor: This inexpensive tool can save you thousands by catching cable damage during installation before you’ve committed to the finished floor.
Poor Floor Sensor Placement: The sensor probe must be positioned correctly between cable runs at the proper depth. Incorrect placement leads to inaccurate temperature readings and inefficient operation.
Ignoring Manufacturer Specifications: Each system has specific requirements for embedding depth, mortar type, and curing time. Following instructions precisely ensures optimal performance and maintains warranty coverage.
Maintenance and Longevity
Floor heating mats require virtually no maintenance once properly installed. The sealed heating cables have no moving parts to wear out or filters to change. However, you should:
- Keep the thermostat clean and dust-free
- Test the system annually before heating season
- Document any unusual behavior or performance changes
- Avoid driving nails or screws through the floor in heated areas
- Maintain records of installation resistance readings for warranty claims
With proper installation and care, quality floor heating mats from brands like LuxHeat and SunTouch regularly last 25+ years. Budget systems typically provide 10-15 years of reliable service.
Floor Heating Mat Price Analysis
| Coverage Area | Budget Range | Mid-Range | Premium |
|---|---|---|---|
| 10-20 sq ft | $150-$250 | $250-$350 | $350-$500 |
| 25-40 sq ft | $220-$350 | $350-$500 | $500-$700 |
| 50-75 sq ft | $350-$500 | $500-$700 | $700-$1,000 |
| 100+ sq ft | $450-$650 | $650-$900 | $900-$1,500 |
Prices include mat, thermostat, sensor, and installation monitor. Professional installation typically adds $8-$15 per square foot for labor and materials.
Frequently Asked Questions About Floor Heating Mats
❓ Can you install floor heating mat yourself?
❓ How long do floor heating mats take to warm up?
❓ Are floor heating mats expensive to run?
❓ Can floor heating mat go under any flooring?
❓ Do floor heating mats increase electricity bills significantly?
Conclusion: Warm Floors Are Within Reach
After reviewing the top floor heating mat systems available in 2025, it’s clear that radiant floor heating has become more accessible, affordable, and efficient than ever. Whether you choose the premium quality of LuxHeat, the value proposition of VEVOR, the proven track record of SunTouch, or the innovative simplicity of QuietWarmth, you’re investing in decades of comfort and energy efficiency.
The initial investment may seem significant, but consider the long-term benefits: lower energy bills, improved home value, enhanced comfort, and that luxurious feeling of warm floors on cold mornings. For most homeowners, the payback period is 5-7 years through energy savings alone—not counting the daily comfort improvements.
Start with a small project like a bathroom to experience the difference firsthand. Once you’ve felt the warmth of radiant floor heating, you’ll likely find yourself planning installations in other rooms. Your feet—and your family—will thank you every winter morning for years to come.
Recommended for You
- 7 Best Knee Heating Pads 2025: Relief for Arthritis & Pain
- 7 Best Infrared Garage Heater 2025 – Expert Reviews & Top Picks
- 7 Best Gas Garage Heaters in 2025 – Save 40% on Energy Bills
Disclaimer: This article contains affiliate links. If you purchase products through these links, we may earn a small commission at no additional cost to you.
✨ Found this helpful? Share it with your friends! 💬🤗