

In This Article
Picture a February morning. The bathroom tile feels like a hockey rink and your toes are filing a formal complaint. The furnace down the hall is pushing out air that’s lukewarm by the time it finds you. Now swap that scene for tile that feels like a sun-warmed beach stone. No roaring fan, no dust tornado from the vents. That’s the promise of radiant floor heating, and in 2026 it has quietly moved from five-star-hotel trick to weekend-project reality.
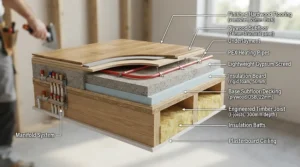
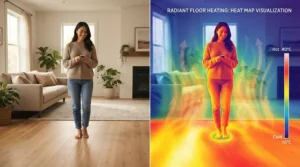
Here’s the idea in one breath. Instead of heating air and hoping it drifts your way, radiant floor heating (underfloor heating, to our UK cousins) warms the surface beneath your feet. That surface then warms you, the furniture, and the walls. Scientific American summarizes the U.S. Department of Energy’s view that radiant systems tend to beat baseboard heat and usually forced air, simply because no energy leaks out through ductwork.
The catch? The market is a crowd. A single Amazon search for radiant floor heating mats returned more than 3,000 results at the time of research, and every listing promises the same cozy miracle. So this guide cuts through the noise. You’ll get seven real products with real specs, an honest look at heated floor installation cost, and a clear breakdown of each electric floor heating system type. You’ll also get a bathroom-specific playbook for in-floor heating for bathroom projects, and a straight answer on radiant heat vs forced air.
One transparency note: this article is research-based analysis built on published specs, manufacturer documentation, and publicly visible review signals. It isn’t a lab test, and it doesn’t pretend to be. Let’s warm things up.
Radiant Floor Heating at a Glance: Which Type Fits Your Home?
Before picking a product, pick a technology. Radiant floor heating comes in three flavors you’ll realistically meet: electric mats, loose electric cable, and hydronic tubing that carries hot water. Each suits a different project, and choosing wrong costs more than any thermostat upgrade ever will.
| Type | How It Works | Typical Installed Cost (Heating Only) | Best For |
|---|---|---|---|
| Electric mat | Pre-spaced cable on mesh, rolled out under tile or flooring | Roughly $8-$15 per sq ft | Bathrooms, small remodels, DIYers |
| Cable-in-membrane or loose cable | Cable snaps into a membrane or is strapped down to fit any layout | Roughly $8-$15 per sq ft, more with premium membranes | Odd-shaped rooms, shower floors, tile pros |
| Hydronic (water-based) | Tubing circulates hot water from a boiler or heat pump | Roughly $10-$20 per sq ft in new builds; $25+ in retrofits | Whole-home heating, new construction |
Looking at the table, electric wins on upfront cost and simplicity for single rooms. That’s why every product in this guide is an electric floor heating system. Hydronic costs more to install but is generally cheaper to run at whole-home scale, so it earns its keep in new builds. If your project is one or two rooms, start with a mat. If the layout has curves, niches, or a shower bench, a cable-in-membrane design justifies its premium.
💬 Just one click — help others make better buying decisions too!😊
Top 7 Radiant Floor Heating Systems: Expert Analysis
Seven systems, one honest rubric: wattage and what it means in practice, what’s in the box, warranty fine print, and the review signals that are actually verifiable. Every pick below is an electric floor heating system, because that’s what most homeowners retrofit. Prices appear as tiers and per-square-foot ranges only. Always check current price before buying, since listings change constantly.
| Product | Output | Listed Warranty | Price Tier | Verifiable Review Signal | Best For |
|---|---|---|---|---|---|
| VEVOR Floor Heating Mat | 12 W/sq ft, 120V | Check listing | Budget | Amazon’s Choice badge on the 30 sq ft listing | First-time DIY bathrooms |
| HEATIT Warmmat | 12 W/sq ft, 120V | 30-year limited (mesh) | Budget-to-mid | Review video referenced on listing | Fixture-heavy layouts |
| LuxHeat Mat Kit | 12 W/sq ft, 120V | 25-year mat, 3-year thermostat | Mid-range | 4.89 across 37 reviews on maker’s site (older snapshot) | Smart-thermostat fans |
| Warming Systems Mat Kit | 120V mats | 25-year | Mid-range | About 900 reviews cited in a 2026 roundup | All-round value |
| SunTouch TapeMat | 12 W/sq ft, 120V/240V | 25-year | Mid-to-upper | Long brand track record | Fast tile-day installs |
| WarmlyYours TempZone Easy Mat | 15 W/sq ft, 120V | 25-year, labor included | Upper-mid | Verify on listing | Cold rooms, high-traffic spots |
| Schluter DITRA-HEAT-E-HK | 12.7 W/sq ft (3-stud) | Check Schluter docs | Premium | Verify on listing | Pro tile jobs, curved layouts |
The table shows a clear pattern: the 12 W/sq ft standard dominates, and the real differences are in thermostats, warranties, and installation method. If you’re heating a small tiled bathroom, the budget and mid-range mats deliver nearly identical warmth, so spend your extra dollars on the thermostat and certification. If the room is cold or the layout is complicated, the WarmlyYours TempZone Easy Mat and Schluter DITRA-HEAT-E-HK earn their higher price tags for different reasons.
1. VEVOR Floor Heating Mat — budget kit with generous extras
Budget shoppers, meet the kit that arrives with more gadgets than some premium rivals. The 30 sq ft version (model SHHM-12-30) pairs a 1/8-inch self-adhesive mat with a touchscreen thermostat. That thermostat offers four events a day across seven days, built-in GFCI, dual air-and-floor sensing, power logging, and a child lock. At 12 W per sq ft, you’re getting roughly 41 BTU per hour per square foot. That’s plenty to take the chill off tile, but not enough to serve as primary heat. A 30 sq ft mat draws about 360 W, so it sits comfortably on a standard circuit.
Based on the spec comparison, this suits first-time DIYers heating a small bathroom or entry. One flag: parts of VEVOR‘s own listing copy cite CE, VDE, and RoHS testing. If your inspector expects UL or cULus listing, confirm the exact SKU before buying. On reviews, the 30 sq ft listing carried an Amazon’s Choice badge at the time of research. I couldn’t verify detailed review text, so scan recent feedback for thermostat durability and support responsiveness.
Pros:
- ✅ Thermostat, alarm, and sensor included in the kit
- ✅ Self-adhesive mesh speeds up layout
- ✅ Low price tier for small-room projects
Cons:
- ❌ Listing cites CE/VDE testing; verify UL status
- ❌ Heating cable can’t be cut, only the mesh
Price: toward the low end of the roughly $5-$12 per square foot range cost guides cite for mats; check current price. Verdict: strong value for small tiled rooms, provided you confirm certification.
2. HEATIT Warmmat — narrow 20-inch strips that snake around fixtures
Narrow can be a superpower when a toilet, vanity, and tub are all fighting for the same floor. The HEATIT Warmmat comes in 20-inch-wide mats, in sizes from 10 to 100 sq ft, all at 12 W/sq ft. The 30 sq ft version runs 18.3 feet long, draws 3 amps (360 W), and sits about 1/8 inch thick on a fiberglass mesh. It’s UL listed, and the listing cites a 30-year limited warranty on the heating mesh.
In practice, a narrower strip means more turns but easier routing around obstacles. The mesh can be cut to turn corners, though the heating cable itself cannot. That makes the HEATIT a smart analytical fit for L-shaped bathrooms and cramped entries. Watch the variants, though. Some listings bundle the ET-7AW Wi-Fi thermostat with GFCI and alarm monitor, while “Only Warmmat” versions omit them. The maker’s own page notes the alarm “screamer” is bought separately with a battery. The Amazon listing links a customer video review, but I couldn’t verify aggregate ratings or recurring complaints, so read recent feedback.
Pros:
- ✅ 20-inch width eases routing around fixtures
- ✅ 30-year limited warranty on the mesh, as listed
- ✅ Sizes from 10 to 100 sq ft
Cons:
- ❌ Bare-mat variants omit thermostat and alarm
- ❌ Heating cable can’t be cut
Price: budget-to-mid tier; check current price. Verdict: great flexibility for the money, as long as you buy the right kit variant.
3. LuxHeat Mat Kit — complete kit with a touchscreen thermostat
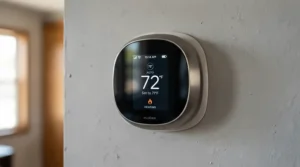
Think of it as the “everything in the box” option, with a thermostat you’ll actually enjoy using. The LuxHeat Mat Kit uses 20-inch self-adhesive mats at 12 W/sq ft. The 20 sq ft version draws 240 W (2 amps). It ships with an OJ Microline UDG4-4999 thermostat featuring a 3.5-inch color touchscreen, Class A GFCI, dual air-and-floor sensing, seven-day programming, power logging, and a child lock. A cable monitor is included. The maker lists cULus approval, wet-location suitability including showers, and low EMF thanks to a dual-conductor, foil-sheathed cable.
Power logging matters more than it sounds. It lets you verify real running time instead of guessing at your bill. The mat carries a 25-year warranty, but the thermostat gets only three years. That’s worth noting, since electronics are usually the first component to need attention. The maker’s site showed a 4.89 rating across 37 reviews in an older snapshot, which is self-reported and dated. One independent 2026 roundup also named the 50 sq ft kit highest-rated in its group. Remember that the heating wires must be fully embedded in thinset, self-leveler, or mortar.
Pros:
- ✅ Touchscreen thermostat with GFCI and power logging
- ✅ 25-year warranty on the heating mat
- ✅ Wide size range, up to 150 sq ft
Cons:
- ❌ Thermostat warranty is only three years
- ❌ Must be fully embedded; no dry-install shortcut
Price: mid-range; check current price. Verdict: excellent value if you want smart control without buying a thermostat separately.
4. Warming Systems Mat Kit — USA-made with a 25-year warranty
If you want fewer unknowns, this is the brand that keeps showing up in roundups. The Warming Systems Mat Kit is a 120V mat sold with a programmable thermostat (the 10 sq ft listing names the TH115), a floor sensor, and an installation monitor. The monitor beeps if the cable gets damaged during tiling, which is cheap insurance against a very expensive mistake. Listings advertise a 25-year warranty and USA manufacturing.
Third-party opinion is favorable, though it isn’t my testing. A mid-2026 roundup crowned the 30 sq ft kit “best overall value,” citing a track record of roughly 909 reviews. Another June 2026 roundup picked the 10 sq ft kit as best overall for small bathrooms. Here’s an honest gap: I couldn’t confirm the watt density from the listing excerpts I reviewed. Confirm it before sizing circuits. Overall, it’s a sensible pick for homeowners who value paperwork, warranty clarity, and a size range that spans small baths to larger rooms.
Pros:
- ✅ Programmable thermostat, sensor, and monitor included
- ✅ 25-year warranty and USA-made per the listing
- ✅ Large review base cited by third-party roundups
Cons:
- ❌ Watt density isn’t obvious from listing headlines
- ❌ Mid-tier price versus budget kits
Price: mid-range; check current price. Verdict: a low-drama choice that balances support, certification, and cost.
5. SunTouch TapeMat — mortar bonds through open-weave mesh
Speed is the headline here. The SunTouch TapeMat from Watts Radiant uses an open-weave mesh edged with double-sided tape, so thinset bonds straight through the mesh. You unroll, tape, trowel, and tile in a day, with no overnight wait for self-leveler. Output is 12 W/sq ft with 3-inch wire spacing, and the whole mat is 0.122 inches thick. The cable uses ETFE insulation, a metal shield, and a PEX outer layer, and the mat is UL listed (UL 1673). A 120V mat draws about 1 amp per 10 sq ft.
Installation details are where the SunTouch shines analytically. It needs at least a 3/8-inch thinset layer. Keep it 4-6 inches from the toilet wax ring. It can go in a tiled shower, though you should verify local code. Sizes run from 10 to 160 sq ft in 120V and 240V. Bundles with a SunStat Command touchscreen thermostat, floor sensor, and alarm exist, but standalone mats ship without a thermostat. I couldn’t verify aggregate ratings, so check current feedback on your chosen size.
Pros:
- ✅ Tape-edged mesh enables one-day installation
- ✅ 25-year warranty from a long-established maker
- ✅ Sizes up to 160 sq ft in 120V and 240V
Cons:
- ❌ Requires at least a 3/8-inch thinset layer
- ❌ Thermostat is separate unless you buy a kit
Price: mid-to-upper tier; check current price. Verdict: worth it for tile-focused DIYers and pros who value time over pennies.
6. WarmlyYours TempZone Easy Mat — 15-watt punch for chilly rooms
Most mats top out at 12 W/sq ft. The WarmlyYours TempZone Easy Mat delivers 15, which the maker describes as the maximum the National Electrical Code allows. That works out to roughly 51 BTU per hour per square foot, about 25% more heat in the same footprint. The one-piece, no-cut mats use a 1/8-inch cable. The 3×5 ft mat (15 sq ft) draws 226 W at 1.89 amps, while the 3×10 ft mat (30 sq ft) draws 450 W at 3.75 amps. Mats are cULus listed, including wet locations, and 120V mats max out at 30 sq ft each.
The warranty is the standout. The maker’s 25-year terms cover not just repair or replacement but also labor and flooring materials needed for the fix. Lifetime technical support is advertised on the Amazon listing. The trade-off is flexibility: one-piece mats can’t be resized, so irregular rooms may suit the maker’s Flex Roll line better. Extra watts also mean extra running cost per hour. Review sentiment wasn’t verifiable from my sources, so read recent feedback.
Pros:
- ✅ 15 W/sq ft output for cold rooms
- ✅ Warranty covers labor and flooring, per the maker
- ✅ Lifetime technical support advertised
Cons:
- ❌ One-piece mats can’t be resized
- ❌ More watts nudges running costs upward
Price: upper-mid tier; check current price. Verdict: a smart upgrade for cold slabs, north-facing baths, and buyers who prize warranty coverage.
7. Schluter DITRA-HEAT-E-HK — cable-in-membrane premium build
This is what tile pros reach for when the floor plan has curves, niches, or a shower bench. The Schluter DITRA-HEAT-E-HK is a twisted-pair cable that snaps into DITRA-HEAT’s uncoupling membrane. No clips, and no self-leveler needed to encapsulate the cable. Standard 3-stud spacing yields 12.7 W/sq ft, while alternating 3-2 spacing lifts that to 15.2 W. The cable is 4.8 mm thick (about 5.5 mm with the membrane), and EMF is minimal. Options exist in 120V and 240V. The kit DHEKRT12056 bundles 37.5 sq ft of cable, membrane sheets covering about 58.8 sq ft, a touchscreen thermostat, and two floor sensors.
The analytical punchline: you’re buying crack insurance along with heat. The uncoupling layer isolates tile from subfloor movement, which protects grout. One 2026 cost guide put a 38 sq ft cable-in-membrane kit at roughly $750-$800, about $20 per square foot. That’s overkill for a 10 sq ft mat job but justified when layout complexity or tile longevity matters. For wet areas, confirm your waterproofing plan with Schluter’s documentation. I couldn’t verify aggregate reviews.
Pros:
- ✅ Cable snaps in; fits virtually any layout
- ✅ Uncoupling membrane protects tile and grout
- ✅ Switchable 12.7 or 15.2 W/sq ft spacing
Cons:
- ❌ Premium cost per square foot
- ❌ Layout planning around membrane studs demands patience
Price: premium, around $20 per square foot in the cited kit; check current price. Verdict: pricey, but the right call for pro-grade tile work.
What Is Radiant Floor Heating?
Radiant floor heating warms a room by sending heat upward from elements installed beneath the floor surface, either electric cables and mats or tubes carrying hot water, instead of blowing heated air through vents. The floor becomes a large, low-temperature radiator that warms people and objects directly, delivering even, quiet comfort without ducts.
Here’s the mechanical reality. Electric resistance cable converts virtually all incoming electricity into heat. Mats run 12-15 W per square foot, which works out to roughly 41-51 BTU per hour per square foot. A 40 sq ft bathroom at 12 W/sq ft draws about 480 W. That’s less than a standard 1,500 W space heater, but spread across the entire floor instead of one glowing coil. That’s why a single electric floor heating system feels gentle rather than blasting.
Electric mats and cables add very little height. Several mats are about 1/8 inch thick. Hydronic systems add more, which matters for door clearances and transitions. Meanwhile, underfloor heating works under many coverings, though tile and stone transmit heat best. One last concept: insulation. Heat goes wherever resistance is lowest, so a cork or insulating underlayment over a slab sends warmth up instead of down. That small decision shapes comfort and your bill more than most gadgets.

How to Choose Radiant Floor Heating: 7 Steps
- Match the technology to the footprint. Electric mats generally work best for spot-heating small spaces like bathrooms, a view echoed by GreenBuildingAdvisor. Hydronic suits whole-home plans.
- Check your floor covering. Tile and stone conduct heat well. Vinyl, laminate, and engineered wood have manufacturer temperature limits, so read them before buying.
- Measure heated area, not room area. Subtract footprints under the vanity, tub, and cabinets, since heating elements shouldn’t sit beneath fixed fixtures.
- Pick a wattage density. Twelve W/sq ft suits most heated rooms, while 15 W/sq ft helps with slabs and cold exposures.
- Confirm the electrical load. A 120V mat draws roughly 1 amp per 10 sq ft, and most thermostats are rated for 15 amps. Have an electrician confirm circuit capacity.
- Prioritize thermostat and warranty. A floor sensor, GFCI, and programmable schedule are non-negotiable. Read whether warranties cover labor.
- Budget for extras. Thinset, underlayment, and electrician time all count toward the final number.
Run through those seven steps and the “best” product usually picks itself.
Heated Floor Installation Cost: What You’ll Really Pay
Let’s talk money. A 2026 HomeGuide cost breakdown puts electric radiant systems at roughly $8-$15 per square foot installed, before flooring goes on top. Bundle in new flooring and the all-in figure climbs to about $10-$40 per square foot. That spread is why heated floor installation cost quotes confuse people: the heater is rarely the expensive part. The tile, labor, and subfloor prep are.
| Cost Component | Typical Range | What Drives It | Best For |
|---|---|---|---|
| DIY mat materials | About $5-$8 per sq ft | Brand, voltage, size | Confident DIYers |
| Professionally installed electric (heating only) | About $8-$15 per sq ft | Labor rates, electrical upgrades | Most remodels |
| Heating plus new flooring | About $10-$40 per sq ft | Tile or stone choice | Full bathroom remodels |
| Electrician hookup | About $200-$500 | Circuit work | DIY mat installs |
| Thermostat upgrade | About $140-$350 | Programmable, Wi-Fi | Smart-home fans |
| Hydronic system | About $10-$20 new, $25+ retrofit | Boiler, tubing | Whole-home heating |
The pattern is clear: heated floor installation cost is dominated by what you’re doing to the floor anyway. If tile is going in regardless, adding a mat is a modest marginal expense. If you’re retrofitting finished floors, costs climb quickly. For a 40 sq ft bathroom, expect roughly $320-$600 for professionally installed heating at $8-$15 per square foot. Cost guides put the typical bathroom total, including new flooring, at roughly $500-$2,800. Always check current price on the products above, and ask contractors to itemize.
Radiant Heat vs Forced Air: Which Wins for Your Home?
The radiant heat vs forced air debate comes down to what you value: surface comfort or whole-house coverage. Forced air heats and cools through ducts. Radiant floor heating warms from below, with no fans stirring the room.
| Factor | Radiant Floor Heating | Forced Air | Best For |
|---|---|---|---|
| Comfort | Even warmth from the floor up | Temperature swings, some drafts | Cold-footed households |
| Air quality | No fan-driven dust circulation | Ducts can circulate dust and allergens | Allergy-prone homes |
| Efficiency | Avoids duct losses | Duct leaks waste energy | Efficiency-minded remodels |
| Installation | Floor work; easiest during remodels | Needs ducts and vents | New builds and renovations |
| Running cost | Electric costs more at whole-home scale | Depends on furnace and fuel | Spot heating vs whole house |
| Cooling | None | Shares ducts with A/C | Hot climates |
Here’s the honest read. Radiant heat vs forced air isn’t a knockout. Electric radiant works best as a supplement, warming the rooms where bare feet live while your existing system handles the rest. Some utility guides claim you can run a radiant thermostat several degrees lower for the same comfort, but savings depend heavily on your home. If you need air conditioning, forced air still earns its ducts. If you hate vents, dust, and cold tile, radiant wins the comfort contest by a mile. Many homeowners end up with both.
In-Floor Heating for Bathroom: What Works and What to Avoid
Bathrooms are where radiant floor heating shines. The floors are tile, the rooms are small, and bare feet are guaranteed. For in-floor heating for bathroom projects, most homeowners need only a 10-30 sq ft mat, which keeps the electrical load low. One 2026 cost guide estimates a single bathroom’s running cost at roughly $4.50-$10 per month, depending on use and local rates.
Plan the layout around heated area only. Skip the footprint under the vanity, tub, and toilet. SunTouch advises keeping its mats 4-6 inches from the toilet wax ring, and most manufacturers want elements away from fixtures. Choose a mat that’s cULus listed for wet locations, and use a thermostat with built-in GFCI. Every kit above includes or offers one.
Which product fits? For a small, simple room, the VEVOR Floor Heating Mat or Warming Systems Mat Kit covers the basics. For fixture-heavy rooms, the narrow HEATIT Warmmat routes more easily. For curved showers and niches, the Schluter DITRA-HEAT-E-HK is the pro choice. Finally, set a preheat schedule. Most mats take a while to warm tile, so have the thermostat start 30-60 minutes before your alarm.
Your First-30-Days Installation and Care Guide for Underfloor Heating
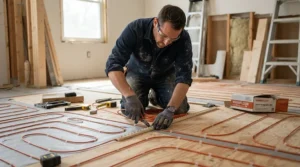
A good install is 90% planning. Here’s the sequence manufacturers generally recommend, adapted for underfloor heating projects.
- Sketch the layout. Mark heated area, fixtures, and where the cold lead meets the thermostat.
- Test resistance first. Use a multimeter to confirm the mat’s ohm reading matches the label. SunTouch publishes expected ranges. Record it.
- Tape and position. Secure the mat with double-sided tape. Cut only the mesh when turning, never the cable.
- Place the floor sensor. Position it between cable loops, per the instructions.
- Test again after thinset. Burying the cable is the riskiest step, so retest before and after.
- Cure before power. Follow the mortar maker’s cure time before switching on.
- Ramp up slowly. Raise temperature gradually over the first days.
Common first-30-day mistakes include cranking the thermostat to max, covering heated areas with thick rugs, and skipping the monthly GFCI test button. Set a schedule instead. A modest, steady schedule beats a heat-blast approach, and your heated floor installation cost pays off in comfort rather than bills.
Real-World Scenarios: Matching Radiant Floor Heating to Real Lives
Here are three hypothetical profiles to show how the picks above play out.
If you’re a first-time DIYer tiling a 25 sq ft half-bath on a tight budget, a kit like the VEVOR Floor Heating Mat or HEATIT Warmmat with an included thermostat gets you in-floor heating for bathroom comfort without a big outlay. Spend the savings on a quality thinset and a licensed electrician for the circuit.
If you’re remodeling a 40 sq ft master bath over a cold crawlspace, consider the 15 W/sq ft WarmlyYours TempZone Easy Mat. The extra output compensates for the heat lost downward, and the labor-inclusive warranty is a bonus. Add an insulating underlayment if the subfloor allows it.
If you’re a tile pro (or serious hobbyist) tackling a curved walk-in shower floor and an adjoining entry, the Schluter DITRA-HEAT-E-HK handles any layout and protects your tile investment. Factor the premium into your heated floor installation cost estimate.
Finally, if your priority is speed on a straightforward rectangular room, the SunTouch TapeMat wins by letting you tile the same day. Each profile balances budget, environment, and frequency of use. Match the system to your real constraints, not the spec sheet’s loudest number.
Features That Actually Matter (And Those That Don’t)
Marketing loves buzzwords, so let’s filter.
Features that matter:
- Floor sensor plus GFCI. This is safety and temperature accuracy in one.
- Installation monitor or alarm. It catches cable damage before tile buries it.
- Warranty terms. Twenty-five years sounds great, but check whether labor and flooring replacement are covered. Only some makers include that.
- Wattage density. Twelve versus 15 W/sq ft is the performance dial that actually changes warmth.
- Certification. Look for UL or cULus listing for wet locations.
Features that matter less:
- Wi-Fi control. Nice for scheduling, but a good seven-day program covers most households.
- “Ultra-low EMF” claims. Several makers advertise it, and it’s a reasonable nice-to-have, but it shouldn’t override certification or warranty.
- Fancy touchscreens. Useful, but not a reason to overpay.
The takeaway: spend on the invisible parts (cable quality, certification, warranty), not the pretty parts.
Long-Term Cost and Maintenance: Running an Electric Floor Heating System
Let’s run the numbers. A 40 sq ft mat at 12 W/sq ft draws 480 W. At an illustrative rate of about 16 cents per kilowatt-hour and four hours of daily use, that’s roughly $9 a month. Your rates and habits will shift this, but it matches the single-bathroom cost estimate above.
Context matters at larger scale. The U.S. Department of Energy notes that electric radiant floors are usually cost-effective only with thick thermal mass and time-of-use utility rates. Penn State’s energy course makes the same point. That’s why a single electric floor heating system suits spot-heating better than whole-home duty. For radiant heat vs forced air at whole-house scale, hydronic usually wins on operating cost.
Maintenance is refreshingly light. Test the GFCI monthly. Keep heavy rugs off heated zones. Note the mismatch between mat warranties (often 25 years) and thermostat warranties (often three), so budget for a thermostat replacement someday. Finally, insulation helps. A cork underlayment over a slab sends heat upward instead of into concrete. Done right, underfloor heating costs pennies per day to enjoy.
Safety, Codes, and Compliance for Radiant Floor Heating
Radiant floor heating is safe when installed correctly, and the rules aren’t mysterious. Use GFCI protection (most thermostats include it). Look for UL or cULus listing, especially for wet areas. Respect the 15 W/sq ft ceiling that WarmlyYours attributes to the National Electrical Code. Never cut the heating cable, never overlap it, and never run it beneath cabinets or fixed fixtures.
Check circuit capacity too. Most 120V mats draw about 1 amp per 10 sq ft, so a 100 sq ft install uses roughly 10 amps. Combined with other loads, you may need a dedicated circuit. Have a licensed electrician make the final connection and check your local permit requirements. Finally, mind floor temperature limits. Many vinyl, laminate, and wood products cap surface temperatures, so follow the flooring manufacturer’s guidance. When in doubt, ask both manufacturers in writing.

Frequently Asked Questions
❓ How much does it cost to run in-floor heating for bathroom use each month?
❓ Can I install an electric floor heating system myself?
❓ Is radiant heat vs forced air cheaper to run?
❓ Does underfloor heating work under vinyl or laminate?
❓ What's the best radiant floor heating for a small bathroom?
Conclusion
So, is radiant floor heating worth it? For bathrooms, kitchens, and entryways, usually yes. The comfort upgrade is real, the electric floor heating system options are mature, and a small mat adds little height or running cost. As a whole-house replacement, electric radiant is a harder sell. On radiant heat vs forced air, the smart move is often both: let your existing system handle the house and let the floor handle your feet.
Here’s the short version of this guide’s picks. Choose the VEVOR Floor Heating Mat or HEATIT Warmmat for budget DIY. Choose the LuxHeat Mat Kit or Warming Systems Mat Kit for balanced value and smart control. Choose the SunTouch TapeMat for fast tile-day installs, the WarmlyYours TempZone Easy Mat for cold rooms, and the Schluter DITRA-HEAT-E-HK for pro-grade layouts. Budget honestly for heated floor installation cost, and plan your in-floor heating for bathroom project around heated area, certification, and a proper circuit.
Recommended for You
- Dyna-Glo Patio Heater: 7 Proven Picks For 2026
- Fire Sense Patio Heater: 7 Best Picks (Ultimate 2026 Guide)
- Infratech Heater Review 2026: 7 Best Models Ranked & Compared
Disclaimer: This article contains affiliate links. As an Amazon Associate, I earn from qualifying purchases. If you purchase products through these links, we may earn a small commission at no additional cost to you.
✨ Found this helpful? Share it with your friends! 💬🤗
